You are using an out of date browser. It may not display this or other websites correctly.
You should upgrade or use an alternative browser.
You should upgrade or use an alternative browser.
Significant Works of Historical Art and Craftsmanship
- Thread starter Niobe
- Start date
Joined May 2014
31,535 Posts | 3,565+
SoCal
Joined Nov 2016
5,776 Posts | 2,668+
Germany
Joined May 2014
31,535 Posts | 3,565+
SoCal
How exactly did you do that?
Joined Nov 2016
5,776 Posts | 2,668+
Germany
Last edited:
How exactly did you do that?
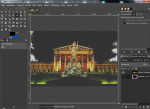
The procedure is based on a mixture of method and improvisation. First I import the primary photo into GIMP, e.g. the Vienna Parliament building. This is the first of two layers. I intensify the contrast a little and sharpen the picture, but also only a little. Then comes the important step of coloring the background black, either when it is even, with the watering can function, or otherwise with a large brush. Afterwards the motive (e.g. the building) is colored by different color filter functions and strengthened again with the contrast function. Then I use the transparency function for this layer and set it to about 60 percent. This makes the image slightly transparent.
Thus you get a picture like the one below.

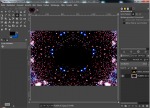
Now I create a second layer with a background motif, in my style this is mostly a picture from the Hubble telescope photo series. The imported image is sharpened and given a strong contrast. The second layer must be below the first layer with the main motif (e.g. building), so that the second layer with the stellar motif shines through (because the first layer is partly transparent). Afterwards, when both layers merge, the contrast and the brightness of both layers have to be regulated in such a way that the image appears harmonious, i.e. not composed of two layers.
That was the methodical part. Now comes the part with the improvisation. The stellar motif is now processed with certain effects, especially the kaleidoscope effect. This effect is a gigantic toy because it offers virtually millions or billions of possibilities that are available to you in a few seconds when you use the tool just as a pianist plays the piano. You can create either symmetric or asymmetric shapes, with a variety that quickly makes you lose track and you run the risk of not being able to decide because there are so many possibilities. Therefore, experience and an unerring eye are important for a successful variation, i.e. you must make the decision at the right moment not to continue, but to keep and save the variant you have just found.

This can take a minute or ten minutes, but it doesn't matter. In any case, you can save several variations and then decide which to use. Now you have the problem that the second layer shines not only through the black background (as it should be), but also through the main motif (e.g. building). This can be interesting, but it is better to remove the lower layer at the place where the main motif lies on the upper (first) layer. This can be done by using a brush to paint black over these areas on the second layer (in my case the stellar layer) so that they do not shine through. Therefore no stars shine through the parliament building, I simply painted them black over and made them invisible.
That is in principle the procedure.
Here's a similar picture I made last year (my photo). The motive is Nymphenburg Castle in Munich. The difference is that I didn't use a kaleidoscope effect, but only worked on the starry sky with contrast filters.

That's a Neptune figure in the castle park (my photo).

This is the front of a baroque church in downtown Munich (my photo). I just inverted the colors, that gives the mystic effect.

That is, somewhat off topic, a Japanese ...., the photo is edited according to the procedure described above, but I used more than 2 layers and let the background partially shine through the main object.

Joined Oct 2013
7,065 Posts | 493+
Planet Nine, Oregon
Van Meegeren has nothing on this guy, the ultimate Vermeer imitator:
Joined Oct 2013
7,065 Posts | 493+
Planet Nine, Oregon
Leonard Campbell Taylor:I think he´s more than an imitator, he has his own style in pictures like these:
View attachment 25382
A couple of these remind me of Vermeer's early work, like The Procuress. They have the same rich saturated colors:

Joined Oct 2013
7,065 Posts | 493+
Planet Nine, Oregon
I agree though, that he is not just a Vermeer imitator, but a very good artist in his own right.I think he´s more than an imitator, he has his own style in pictures like these:
View attachment 25382
View attachment 25383
View attachment 25384
Joined Oct 2013
7,065 Posts | 493+
Planet Nine, Oregon
Hammershoi is another painter of quiet domestic interiors with light shining in; his paintings are mysterious and dreamlike:


Joined Aug 2019
104 Posts | 154+
Livingston 62° 38′ 27″ S, 60° 22′ 0.98″ W
Me gusta cabronazzi.
Enviado desde mi iPad utilizando Tapatalk Pro
Joined Aug 2019
104 Posts | 154+
Livingston 62° 38′ 27″ S, 60° 22′ 0.98″ W
...... socks made in France by the order of the English Baroness Swayling, 1899, silk, beads, sequins.


Joined Aug 2019
104 Posts | 154+
Livingston 62° 38′ 27″ S, 60° 22′ 0.98″ W
Constantine's Crown of Aragon in the Palermo Cathedral. Constanta Aragon (1179/1184, † 23 June 1222 in Catania) was in her first marriage the Queen of Hungary (1196-1204), in her second marriage the Queen of Sicily, and in 1212 the German Queen (1212-1222); she was crowned with her husband Frederick II, of whom she was the first wife, in 1220 in Rome for the Empress of the Holy Roman Empire (1220-1222).


Joined May 2014
31,535 Posts | 3,565+
SoCal
The People’s Palace in Tripoli, the royal seat of Libya’s monarchy from 1951–69, then the seat of the General People’s Committee 1977–2011 and Museum of Libya and public library 1969–present:


Joined May 2014
31,535 Posts | 3,565+
SoCal
The monumental gate of Istana Negara Jalan Duta (the Malaysian royal palace), Malaysia:

Golestan Palace in Tehran:


Golestan Palace in Tehran:

Joined May 2014
31,535 Posts | 3,565+
SoCal
Ambavilas Palace, famous as Mysore Palace, the official residence of Maharajas of Mysore since 1400:

Pagaruyung Palace, West Sumatra, Indonesia:

The Palacio Nacional, or National Palace in Mexico City, built as the residence of the Viceroys of New Spain in 1563:

Palais de Justice of Paris, France:


Pagaruyung Palace, West Sumatra, Indonesia:
The Palacio Nacional, or National Palace in Mexico City, built as the residence of the Viceroys of New Spain in 1563:

Palais de Justice of Paris, France:
Joined May 2014
31,535 Posts | 3,565+
SoCal
The Umaid Bhawan Palace in Jodhpur, India:

Beiteddine Palace built in the 15th century in Lebanon:

Károlyi Palace of Parádsasvár, Hungary:


Beiteddine Palace built in the 15th century in Lebanon:

Károlyi Palace of Parádsasvár, Hungary:

More History Discussions
- Replies
- 2
- Views
- 5K
Trending History Discussions
-
The Great Captains of History - How Many Battles? - Version 7
- Started by DiocletianIsBetterThanYou
- Replies: 861
-
-
The Great Captains of History - How Many Battles? - Version 5
- Started by DiocletianIsBetterThanYou
- Replies: 3K
-
The Diversity Of Early African Architecture/Ruins Thread
- Started by Kilwa Sultanate
- Replies: 2K
-


